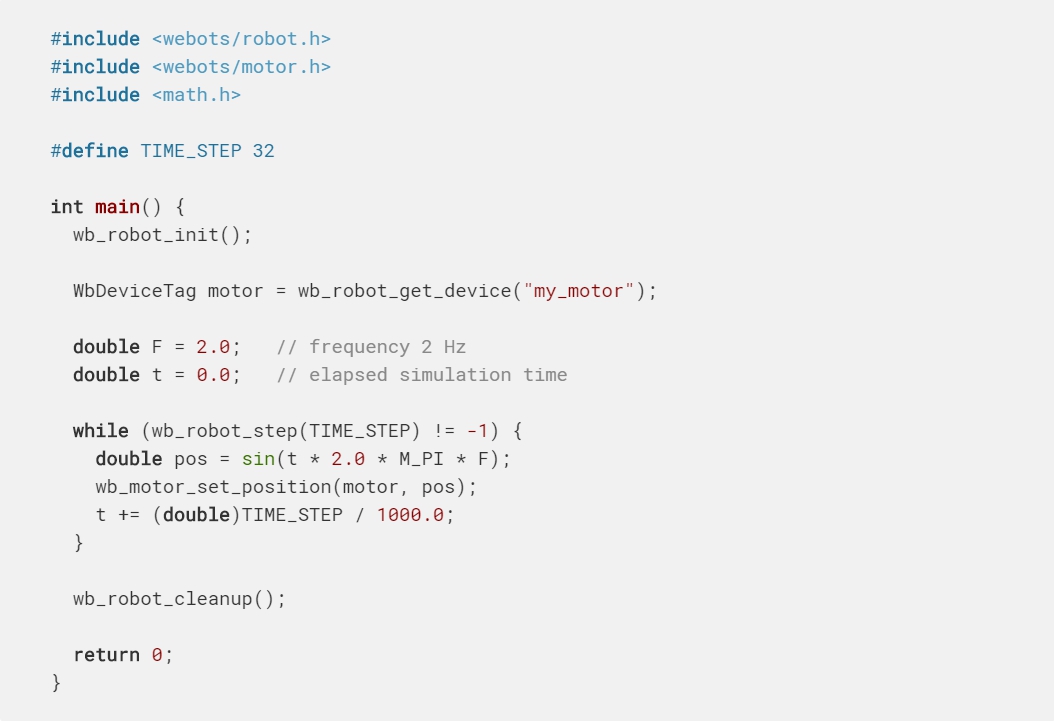
The example below shows how to make a rotational motor oscillate with a 2 Hz sine signal.
Just like sensors, each Webots actuator must be identified by a WbDeviceTag returned by the wb_robot_get_device function. However, unlike sensors, actuators don't need to be expressly enabled; they actually don't have wb_*_enable functions.
以下示例顯示瞭如何使旋轉電機以2 Hz正弦信號振盪。
就像傳感器一樣,每個Webots執行器都必須由wb_robot_get_device函數返回的WbDeviceTag進行標識。 但是,與傳感器不同的是,無需明確啟用執行器。 他們實際上沒有wb _ * _ enable函數。
To control a motion, it is generally useful to decompose that motion in discrete steps that correspond to the control step. As before, an infinite loop is used here: at each iteration a new target position is computed according to a sine equation. The wb_motor_set_position function stores a new position request for the corresponding rotational motor. Note that the wb_motor_set_position function stores the new position, but it does not immediately actuate the motor. The effective actuation starts on the next line, in the call to the wb_robot_step function.
為了控制運動,通常以與控制步驟相對應的離散步驟分解該運動。 如前所述,這裡使用了無限循環:在每次迭代中,根據正弦方程計算新的目標位置。 wb_motor_set_position函數存儲相應旋轉電機的新位置請求。 請注意,wb_motor_set_position函數存儲新位置,但不會立即啟動電動機。 有效的致動從對wb_robot_step函數的調用的下一行開始。
The wb_robot_step function sends the actuation command to the RotationalMotor but it does not wait for the RotationalMotor to complete the motion (i.e. reach the specified target position); it just simulates the motor's motion for the specified number of milliseconds.
wb_robot_step函數將致動命令發送到RotationalMotor,但不等待RotationalMotor完成運動(即到達指定的目標位置); 它只是在指定的毫秒數內模擬電動機的運動。
When the wb_robot_step function returns, the motor has moved by a certain (linear or rotational) amount which depends on the target position, the duration of the control step (specified with the wb_robot_step function argument), the velocity, acceleration, force, and other parameters specified in the ".wbt" description of the Motor.
當wb_robot_step函數返回時,電機已移動了一定量(線性或旋轉),具體取決於目標位置,控制步驟的持續時間(由wb_robot_step函數參數指定),速度,加速度,力等 電動機的“ .wbt”描述中指定的參數。
For example, if a very small control step or a low motor velocity is specified, the motor will not have moved much when the wb_robot_step function returns. In this case several control steps are required for the RotationalMotor to reach the target position. If a longer duration or a higher velocity is specified, then the motor may have fully completed the motion when the wb_robot_step function returns.
例如,如果指定了非常小的控制步長或較低的電動機速度,則當wb_robot_step函數返回時,電動機將不會移動太多。 在這種情況下,RotationalMotor需要幾個控制步驟才能達到目標位置。 如果指定了更長的持續時間或更高的速度,則當wb_robot_step函數返回時,電動機可能已完全完成運動。
Note that the wb_motor_set_position function only specifies the desired target position. Just like with real robots, it is possible (in physics-based simulations only), that the RotationalMotor is not able to reach this position, because it is blocked by obstacles or because the motor's torque (maxForce) is insufficient to oppose gravity, etc.
請注意,wb_motor_set_position函數僅指定所需的目標位置。 就像真正的機器人一樣,RotationalMotor有可能(僅在基於物理的模擬中)無法到達此位置,原因是它被障礙物阻擋,或者因為電動機的扭矩(maxForce)不足以抵抗重力等。
If you want to control the motion of several RotationalMotors simultaneously, then you need to specify the desired position for each RotationalMotor separately, using the wb_motor_set_position function. Then you need to call the wb_robot_step function once to actuate all the RotationalMotors simultaneously.
如果要同時控制多個RotationalMotor的運動,則需要使用wb_motor_set_position函數分別為每個RotationalMotor指定所需的位置。 然後,您需要調用wb_robot_step函數一次以同時啟動所有RotationalMotor。
The "step" and "wb_robot_step" Functions
“步驟”和“ wb機器人步驟”功能
Webots uses two different time steps:
- The simulation step (specified in the Scene Tree:
WorldInfo.basicTimeStep)
- The control step (specified as an argument of the
wb_robot_step function for each robot)
Webots使用兩個不同的時間步驟:
模擬步驟(在“場景樹”中指定:WorldInfo.basicTimeStep)
控制步驟(指定為每個機器人的wb_robot_step函數的參數)
The simulation step is the value specified in WorldInfo.basicTimeStep (in milliseconds). It indicates the duration of one step of simulation, i.e. the time interval between two computations of the position, speed, collisions, etc. of every simulated object. If the simulation uses physics (vs. kinematics), then the simulation step also specifies the interval between two computations of the forces and torques that need to be applied to the simulated rigid bodies.
模擬步驟是WorldInfo.basicTimeStep中指定的值(以毫秒為單位)。 它指示了一個模擬步驟的持續時間,即每個模擬對象的位置,速度,碰撞等兩次計算之間的時間間隔。 如果模擬使用物理學(相對於運動學),則模擬步驟還指定需要對模擬剛體施加力和扭矩的兩次計算之間的間隔。
The control step is the duration of an iteration of the control loop. It corresponds to the parameter passed to the wb_robot_step function. The wb_robot_step function advances the controller time of the specified duration. It also synchronizes the sensors and actuators data with the simulator according to the controller time.
控制步驟是控制循環迭代的持續時間。 它對應於傳遞給wb_robot_step函數的參數。 wb_robot_step函數可將指定時間的控制器時間提前。 它還根據控制器時間將傳感器和執行器的數據與模擬器同步。
Every controller needs to call the wb_robot_step function at regular intervals. If a controller does not call the wb_robot_step function, then the sensors and actuators won't be updated and the simulator will block (in synchronous mode only). Because it needs to be called regularly, the wb_robot_step function call is usually placed in the main loop of the controller.
每個控制器都需要定期調用wb_robot_step函數。 如果控制器未調用wb_robot_step函數,則不會更新傳感器和執行器,並且模擬器將阻塞(僅在同步模式下)。 由於需要定期調用,因此wb_robot_step函數調用通常位於控制器的主循環中。
The execution of a simulation step is an atomic operation: it cannot be interrupted. Hence a sensor measurement or a motor actuation can only take place between two simulation steps. For that reason the control step specified with each wb_robot_step function calls must be a multiple of the simulation step. So, for example, if the simulation step is 16 ms, then the control step argument passed to the wb_robot_step function can be 16, 32, 64, 128, etc.
模擬步驟的執行是一項原子操作:不能中斷。 因此,傳感器測量或電機驅動只能在兩個模擬步驟之間進行。 因此,每個wb_robot_step函數調用指定的控制步驟必須是模擬步驟的倍數。 因此,例如,如果模擬步驟為16 ms,則傳遞給wb_robot_step函數的控制步驟參數可以為16、32、64、128等。
If the simulation is run in step-by-step mode, i.e., by clicking on the Step button (see The User Interface section), then a single step having the simulation step duration is executed. The following figure depicts in details the synchronization between the simulation status, the controller status and the step clicks.
如果仿真以逐步模式運行,即通過單擊“步進”按鈕(請參見“用戶界面”部分),則將執行具有仿真步長的單個步驟。 下圖詳細描述了仿真狀態,控制器狀態和步驟咔嗒聲之間的同步。
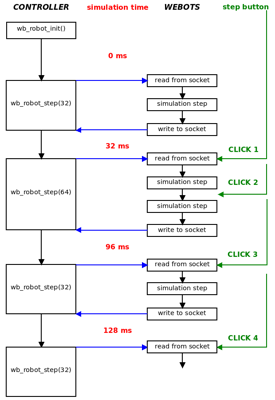
At every step, all the commands before the wb_robot_step function call statements are executed first and the simulation stops in the middle of the execution of the wb_robot_step function. Webots API functions are executed but they are applied to the simulation world only when calling the wb_robot_step function, that is when the controller process communicates with Webots process. When the simulation stops, the new simulation status has already been computed, the simulation time has been updated and the new sensors values are ready. Note that the first step includes the initialization too. So all the statements before the second wb_robot_step function call are executed.
在每個步驟中,首先執行wb_robot_step函數調用語句之前的所有命令,並且模擬在wb_robot_step函數執行的中間停止。 Webots API函數已執行,但僅在調用wb_robot_step函數時(即,控制器進程與Webots進程進行通信時),它們才被應用到仿真世界。 模擬停止時,已經計算出新的模擬狀態,更新了模擬時間,並且準備了新的傳感器值。 請注意,第一步也包括初始化。 因此,第二個wb_robot_step函數調用之前的所有語句都將執行。
Using Sensors and Actuators Together
一起使用傳感器和執行器
Webots and each robot controller are executed in separate processes. For example, if a simulation involves two robots, there will be three processes in total: one for Webots and two for the two robots. Each controller process exchanges sensors and actuators data with the Webots process during the wb_robot_step function calls. So for example, the wb_motor_set_position function does not immediately send the data to Webots. Instead it stores the data locally and the data is effectively sent when the wb_robot_step function is called.
Webot和每個機器人控制器在單獨的過程中執行。 例如,如果一個模擬涉及兩個機器人,則總共將有三個過程:一個用於Webot,兩個用於兩個機器人。 在wb_robot_step函數調用期間,每個控制器進程都與Webots進程交換傳感器和執行器數據。 因此,例如,wb_motor_set_position函數不會立即將數據發送到Webots。 相反,它在本地存儲數據,並且在調用wb_robot_step函數時有效地發送了數據。
For that reason the following code snippet is a bad example. Clearly, the value specified with the first call to the wb_motor_set_position function will be overwritten by the second call:
因此,以下代碼段是一個不好的示例。 顯然,第一次調用wb_motor_set_position函數指定的值將被第二次調用覆蓋:
Similarly this code does not make much sense either:
同樣,此代碼也沒有太大意義:
Since there was no call to the wb_robot_step function between the two sensor readings, the values returned by the sensor cannot have changed in the meantime. A working version would look like this:
由於在兩個傳感器讀數之間沒有調用wb_robot_step函數,因此在此期間傳感器返回的值不能更改。 工作版本如下所示:
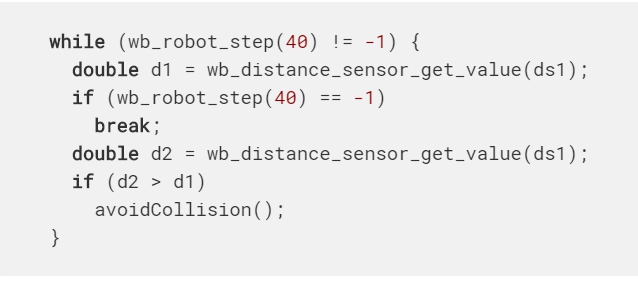
However, the generally recommended approach is to have a single wb_robot_step function call in the main control loop, and to use it to update all the sensors and actuators simultaneously, like this:
但是,通常建議的方法是在主控制循環中只有一個wb_robot_step函數調用,並使用它同時更新所有傳感器和執行器,如下所示:
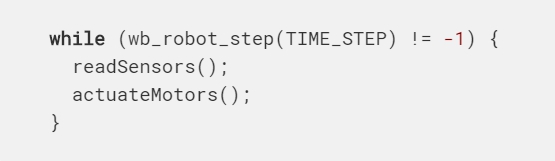
Note that it is important to call the wb_robot_step function at the beginning of the loop, in order to make sure that the sensors already have valid values prior to entering the readSensors function. Otherwise the sensors will have undefined values during the first iteration of the loop, hence, the following is not a good example:
請注意,在循環開始時調用wb_robot_step函數很重要,以確保在進入readSensors函數之前傳感器已經具有有效值。 否則,在循環的第一次迭代中,傳感器將具有不確定的值,因此,以下示例不是一個好例子:

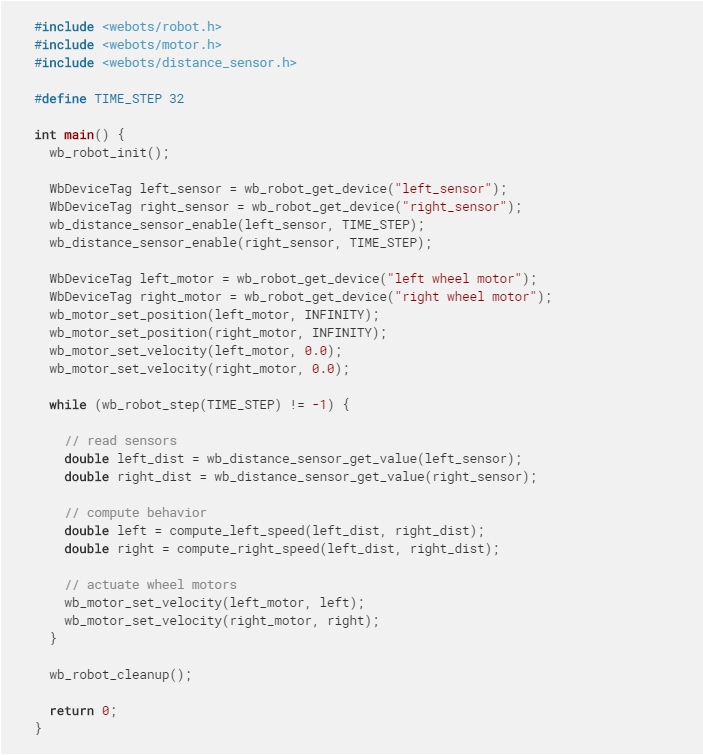
Here is a complete example of using sensors and actuators together. The robot used here is using differential steering. It uses two proximity sensors (DistanceSensor) to detect obstacles.
這是一起使用傳感器和執行器的完整示例。 這裡使用的機器人正在使用差速轉向。 它使用兩個接近傳感器(DistanceSensor)來檢測障礙物。
Using Controller Arguments
使用控制器參數
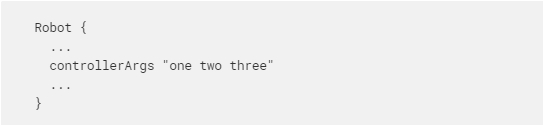
In the ".wbt" file, it is possible to specify arguments that are passed to a controller when it starts. They are specified in the controllerArgs field of the Robot node, and they are passed as parameters of the main function. For example, this can be used to specify parameters that vary for each robot's controller.
For example if we have:
在“ .wbt”文件中,可以指定啟動時傳遞給控制器的參數。 它們在Robot節點的controllerArgs字段中指定,並作為主函數的參數傳遞。 例如,可用於指定隨每個機器人控制器而變化的參數。
例如,如果我們有:
And if the controller's name is "demo", then this sample controller code:
如果控制器的名稱為“ demo”,則此示例控制器代碼為:
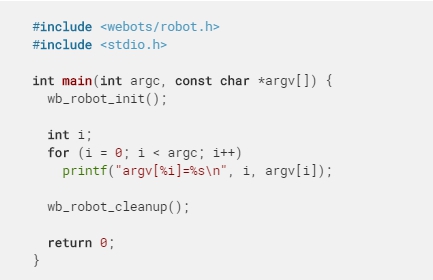
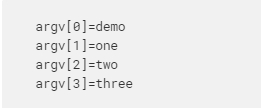
This will print:
這將打印:
Controller Termination
控制器終端
Usually a controller process runs in an endless loop: it is terminated (killed) when Webots quits, the simulation is reset, the world is reloaded, a new simulation is loaded, or the controller name is changed in the Webots scene tree. The controller cannot prevent its own termination but it can be notified shortly before this happens.
通常,控制器進程會無休止地運行:當Webots退出,模擬被重置,世界被重新加載,新的模擬被加載或者Webots場景樹中的控制器名稱被更改時,它終止(被殺死)。 控制器無法阻止其自身終止,但是可以在發生這種情況之前立即通知控制器。
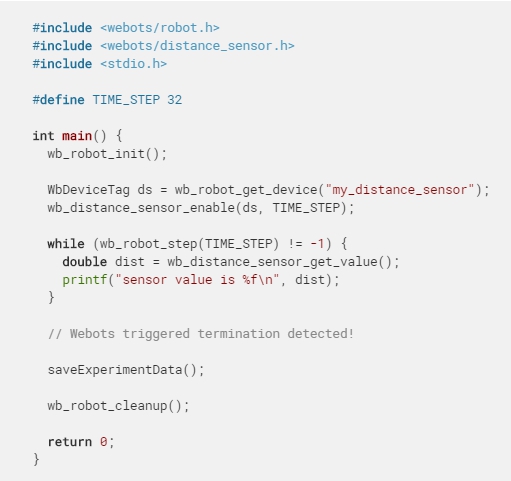
The wb_robot_step function returns -1 when the controller process is going to be terminated by Webots. Then the controller has 1 second (real time) to save important data, close files, etc. before it is effectively killed by Webots. Here is an example that shows how to save data before the upcoming termination:
當控制器進程將由Webots終止時,wb_robot_step函數返回-1。 然後,控制器將有1秒(實時)的時間來保存重要數據,關閉文件等,直到Webots有效地將其殺死。 這是顯示如何在即將終止之前保存數據的示例:
In some cases, it is up to the controller to make the decision of terminating the simulation. For example in the case of search and optimization algorithms: the search may terminate when a solution is found or after a fixed number of iterations (or generations).
在某些情況下,取決於控制器來決定終止仿真。 例如,在搜索和優化算法的情況下:當找到解決方案時或在固定數量的迭代(或生成)之後,搜索可能會終止。
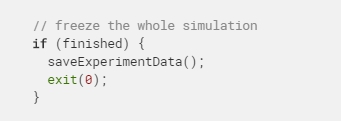
In this case the controller should just save the experiment results and quit by returning from the main function or by calling the exit function. This will terminate the controller process and freeze the simulation at the current simulation step. The physics simulation and every robot involved in the simulation will stop.
在這種情況下,控制器應只保存實驗結果並通過從主函數返回或調用退出函數退出。 這將終止控制器過程並凍結當前模擬步驟的模擬。 物理模擬以及模擬中涉及的每個機器人都將停止。
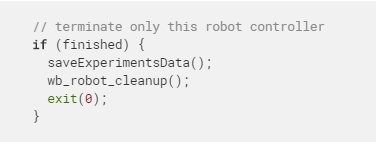
If only one robot controller needs to terminate but the simulation should continue with the other robots, then the terminating robot should call the wb_robot_cleanup function right before quitting:
如果僅一個機器人控制器需要終止,而仿真應與其他機器人繼續進行,則終止的機器人應在退出之前立即調用wb_robot_cleanup函數:
Note that the exit status as well as the value returned by the main function are ignored by Webots.
請注意,Webots會忽略退出狀態以及主函數返回的值。
Shared Libraries
共享庫
Creating shared libraries can be very useful to share code between controllers and/or plugins. There are several ways to do so, but we recommend to place them into a subdirectory of the libraries directory of your project. Indeed the environment variables of the controllers are modified to include these paths into your [[DY]LD_LIBRARY_]PATH environment variable (depending on the OS). Moreover the main Makefile ("WEBOTS_HOME/resources/Makefile.include") used to compile Webots controllers is able to create shared libraries and to link easily with the Controller libraries, ODE or the Qt framework.
創建共享庫對於在控制器和/或插件之間共享代碼非常有用。 有幾種方法可以這樣做,但是我們建議將它們放在項目庫目錄的子目錄中。 實際上,已修改控制器的環境變量,以將這些路徑包括到您的[[DY] LD_LIBRARY_] PATH環境變量中(取決於OS)。 此外,用於編譯Webots控制器的主要Makefile(“ WEBOTS_HOME / resources / Makefile.include”)能夠創建共享庫,並可以輕鬆地與Controller庫,ODE或Qt框架鏈接。
A good example of this is the Qt utility library located there: "WEBOTS_HOME/resources/projects/libraries/qt_utils".
If for some reason shared libraries cannot be in the libraries directory, the WEBOTS_LIBRARY_PATH environment variable will be very helpful. The paths it contains will be added at the beginning of the library search path([[DY]LD_LIBRARY_]PATH) when starting the controller.
一個很好的例子是位於此處的Qt實用程序庫:“ WEBOTS_HOME / resources / projects / libraries / qt_utils”。
如果由於某種原因共享庫不能位於庫目錄中,則WEBOTS_LIBRARY_PATH環境變量將非常有幫助。 啟動控制器時,它包含的路徑將添加到庫搜索路徑([[DY] LD_LIBRARY_] PATH)的開頭。
Environment Variables
環境變量
For some projects it will be necessary to define or change variables defined in your environment. They can be changed in the settings of the computer but it may last only for the current session or create conflict with other applications or projects. Webots offers an elegant solution to this. A configuration file named "runtime.ini" can be added to the controller directory. Any environment variable defined in this file will be loaded to the environment each time the controller starts.
對於某些項目,有必要定義或更改在您的環境中定義的變量。 可以在計算機的設置中更改它們,但可能僅持續當前會話,或者與其他應用程序或項目產生衝突。 Webots為此提供了一個優雅的解決方案。 可以將名為“ runtime.ini”的配置文件添加到控制器目錄。 每次控制器啟動時,此文件中定義的任何環境變量都會加載到環境中。
This configuration file uses the standard INI template that is really simple and easy to write and read. It contains pairs of key and value that can be inside [sections]. Comments can be written on a line after using a semicolon ';' character.
Environment variables in this file can contain references to other environment variables using this syntax : $(MY_VARIABLE_NAME). They will be automatically replaced by the actual value already existing in the environment. The Webots "runtime.ini" supports 7 sections:
此配置文件使用標準的INI模板,該模板非常簡單,易於讀寫。 它包含可以在[sections]內部的鍵和值對。 使用分號“;”後可以在一行上寫註釋。 字符。
該文件中的環境變量可以使用以下語法包含對其他環境變量的引用:$(MY_VARIABLE_NAME)。 它們將自動替換為環境中已經存在的實際值。 Webots的“ runtime.ini”支持7個部分:
-
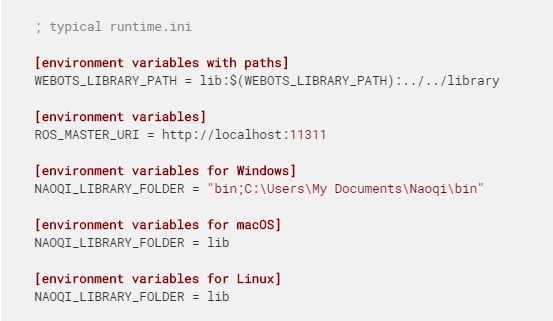
[environment variables with paths]
This section should only contain environment variables with either relative or absolute paths. Paths must be separated using the colon symbol ':' and directory components must be separated using the slash symbol '/'. Variables declared in this section will be added on every platform. On Windows, colons will be replaced by semicolon and slash will be replaced by backslash according to the Windows syntax.
-
[environment variables]
Environment variables defined in this section will also be added to the environment on every platform but they will be written directly with no syntax change. It's a good location for variables that don't contain any path.
-
[environment variables for Windows]
Variables defined in this section will only be added to the environment if the controller is ran on the Windows platform. If you want to declare paths in this section, the value should be written between double-quotes symbols ".
-
[environment variables for macOS]
Variables defined here will only be added on macOS and ignored on other platforms.
-
[environment variables for Linux]
Variables defined here will be added on all Linux platforms but not on Mac nor Windows.
-
[environment variables for Linux 32]
These variables will be added only if the Linux platform is 32 bit.
-
[environment variables for Linux 64]
These variables will be added only if the Linux platform is 64 bit.
[帶路徑的環境變量]
此部分應僅包含具有相對路徑或絕對路徑的環境變量。路徑必須使用冒號':'分隔,目錄組件必須使用斜杠'/'分隔。本節中聲明的變量將在每個平台上添加。在Windows上,根據Windows語法,冒號將由分號替換,斜杠將由反斜杠替換。
[環境變量]
本節中定義的環境變量也將添加到每個平台的環境中,但是它們將直接編寫而無需更改語法。對於不包含任何路徑的變量,這是一個很好的位置。
[Windows環境變量]
僅當在Windows平台上運行控制器時,才會將本節中定義的變量添加到環境中。如果要在本節中聲明路徑,則應在雙引號符號“之間寫入值。
[macOS的環境變量]
此處定義的變量將僅在macOS上添加,而在其他平台上被忽略。
[Linux的環境變量]
此處定義的變量將在所有Linux平台上添加,但不會在Mac和Windows上添加。
[Linux 32的環境變量]
僅當Linux平台為32位時,才添加這些變量。
[Linux 64的環境變量]
僅當Linux平台是64位時,才添加這些變量。
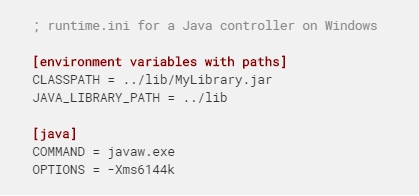
Here is an example of a typical runtime.ini file.
這是典型的runtime.ini文件的示例。
Languages Settings
語言設定
The "runtime.ini" file may also contain language specific sections, named [java], [python] and [matlab]. Each of this section may include two keys, namely COMMAND and OPTIONS. The COMMAND key allows you to define a specific version of the language interpreter whereas the OPTIONS key allows you to access specific options that will be passed immediately to the language interpreter. For example:
“ runtime.ini”文件還可能包含特定於語言的部分,名為[java],[python]和[matlab]。 每個部分都可以包括兩個鍵,即COMMAND和OPTIONS。 COMMAND鍵允許您定義語言解釋器的特定版本,而OPTIONS鍵則允許您訪問將立即傳遞給語言解釋器的特定選項。 例如:
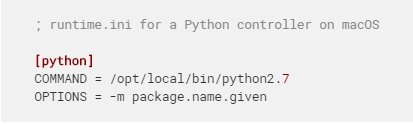
In the example above, the resulting command issued by Webots will be: /opt/local/bin/python2.7 -m package.name.given my_controller.py possibly followed by the value of the controllerArgs field of the corresponding Robot node.
在上面的示例中,Webots發出的結果命令將是:/opt/local/bin/python2.7 -m package.name.given my_controller.py,其後可能是相應Robot節點的controllerArgs字段的值。